
Footers Part 1: Building the Frames
- Steven and Ashley
- Jun 8, 2020
- 6 min read
Updated: Jun 22, 2020
Note: Skip to the end for time-lapse videos of the entire framing process.
We didn’t spend long celebrating once the long and unexpectedly difficult excavation was complete. We’d lost a lot of time already on that mythical schedule of ours, so we immediately started sighting the corners more accurately to get started on the next project: Footers.
Normally this is an easy enough task and accomplished by driving stakes into the ground at the
corners while you fine tune the measurements. Unfortunately, this would be another place where the bedrock would cause us problems. Sure, we could drill into the rock and put a concrete anchor there, but we needed a solution that would stay in place, support a tight string, but still be able to shifted for fine tuning. The solution turned out to be large rocks (which, lucky us, we’d just made a bunch of) with concrete anchors set into them. That meant we could still move them for adjustments, but they were heavy stable enough to hold a string taut without being accidentally moved.

That was when we discovered that our painstakingly excavated hole wasn't quite large enough to fit our design. After everything we went through, finding out that we somehow didn't end up with the correct dimensions was pretty disheartening. We knew through careful sighting and surveying that we’d measured our dig site correctly and excavated correctly... but, as it turned out, only at the top of the hole. During the excavation, the hole began to taper slightly inward toward the bottom without our awareness, a problem that compounded through the dig until the dimensions at the base shrank considerably. The large, expensive rock breaking equipment was long gone. What were we going to do now?
The backhoe and breaker are too expensive ($2K for the weekend) for this small amount of rock removal, but it was still far too much to try to shape with a pickaxe or chisels. We wondered if an electric jackhammer would do the trick and found our local tool rental had one for less than $100 a day. I still wasn't sure if it was going to be powerful enough, especially considering the rock breaker on the skid steer was not enough, but we hooked it up to our portable generator and went to it.

Occasionally on a build something actually goes right, and this was one of those rare times. The jackhammer was heavy and there was a lot of rock to get through on both the walls and to level out on the bedrock, but it did the job well. By the end of the weekend our corners were finally measuring right, but we were still concerned about the extra space needed around the house for working and safety. After all, there was only about a foot of space in some places between the rock wall and the edge of the footer. The only information we could find online said to slope dirt excavations at 45 degrees away from the base. There was no recommendation for solid rock excavations (because what moron would try to excavate in solid rock, right?). We took pictures and sent them to our ICF contractor for advice.
He recommended allowing a little more space in the back, so we shifted the footprint forward to give him about an additional two feet. But this still required us to do yet some more rock breaking. Good thing we were practically pros at demolishing rock by this point! After yet another jackhammer rental and weekend of work, we finally seemed to have it. Eight months of work and we finally have a hole in the ground. Yay! Yay? Yay.
Now that the corners were set, we needed to put up batter boards. In normal house builds, this is typically very easy like the corners; drive some stakes into the ground and attach some horizontal boards. Piece of cake, right? But we’re those morons mentioned above who decided to excavate straight into rock.
So how did we get around this? Well, we did have a solid rock wall in the back, so we decided to put it to use. We drilled holes into the wall with a concrete drill and put up 2x4 boards with concrete anchors in them. It worked great, and they weren’t budging for anything less than an earthquake. In the front we didn't have a rock wall so we built very short stud frames and anchored them directly to bedrock with the same drill and anchors with similar success. Surprisingly, the rock actually worked in our favor to help make sure our batter boards would stay true once we measured* and nailed the string holders in place.


*Just as an FYI, we spent a solid weekend in the hottest part of the summer sighting again and again to make sure we had the strings laid out just right and as perfectly square as we could get them. There was a lot of cussing as we made micro adjustments for hours on end, but it was definitely worth it in the long run. What’s the old saying – measure twenty times and cut once, right? Yeah, something like that.
Now we just need to build the footer forms. Again, these are usually based on stakes driven in the ground which we couldn't do. We had to build an intricate frame system using concrete anchors attached directly to the solid ground. This took both of us working is the summer sun many weekends to complete. It was a lot of stooped over, low ground, tedious work. We were fortunate that the trees we were careful to leave near the house enabled us to hoist a huge shade canopy cobbled together from several mesh tarps picked up at Harbor Freight over the hole to get some relief from the heat. You wouldn't think a mesh screen that lets light though would give you any relief from the sun but you might be surprised. I couldn't believe the difference it made. Worth every penny, which, coming from Harbor Freight, wasn't very much.


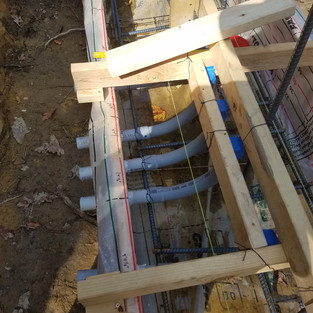
Once the forms were complete, we had to make them capable of holding concrete. Normally you’d use plywood and pack earth around the gaps, but due to the uneven ground and multiple gaps in the rock, we chose to use a flexible fabric form from a company called Fastfoot made specifically for this purpose. It's really just a strong plastic sheet that you staple to the inside of the forms, and a measured grid printed on it helps ensure you can use it on footers of several different dimensions. With a sturdy frame in place and the fabric over it, you don't have to use plywood to box it out. It also sealed nicely around the perforations where pipe or conduit would exit via the footer.


With that in place, it was time for the rebar. Fortunately, this job went much easier than I thought it would and we were able to work out a rhythm like we did in assembling the footers. I placed the rebar in the form on top of the chairs to keep it off the ground as Ash came along behind me to tie it together with the proper overlap. We elected to have our vertical rebar prebent by the supplier. It saved us the labor of 100 bends and was a surprisingly negligible cost. We did do the perimeter bends ourselves though to make sure the overlaps were in the right place. We also opted to install our vertical rebar and tie it down directly rather than wait until the pour to place it in the concrete as it set. It meant assembling a secondary 2x4 rail along the top center of the forms to attach the verticals to, but it also meant we could ensure they stayed straight. It was also fortuitous for other reasons, which you’ll read about in the next post.


With that complete, we rented a rotary laser for a final check of the footer frame and did some slight shimming to make it perfect, as well as making a pretty cool little light show as night came on.
Now, finally, we were ready for the pour. Stay tuned next week for Part 2!

Comments